EagleBear2002 的博客

这里必须根绝一切犹豫,这里任何怯懦都无济于事

Web 前端开发-10-express

什么是 Express?

Express 是最流行的 node web 框架,它是许多其他流行的节点 web 框架的底层库。它提供了机制:

  1. 在不同的 URL 路径(路由)中使用不同 HTTP 动词的请求编写处理程序。
  2. 与“视图”呈现引擎集成,以便通过将数据插入模板来生成响应。
  3. 设置常见的 web 应用程序设置,比如用于连接的端口,以及用于呈现响应的模板的位置。
  4. 在请求处理管道的任何位置添加额外的请求处理“中间件”。

虽然 Express 本身是非常简单的,但是开发人员已经创建了兼容的中间件包来解决几乎所有的 web 开发问题。

cookie、会话、用户登录、URL 参数、POST 数据、安全标头等等。

特点

  • 精简
  • 灵活
  • web 程序框架
  • 单页 web 程序
  • 多页和混合的 web 程序

Is Express opinionated?

Web 框架通常将自己称为“固执己见”或“不固执己见”。

固执的框架认为应该有一套“标准答案”来解决各类具体任务。 通常支持特定领域的快速开发(解决特定类型的问题)。因为标准答案通常易于理解且文档丰富。然而在解决主领域之外的问题时,就会显得不那么灵活,可用的组件和方法也更少。

Express 是不固执己见的,是高度包容的。

  • 几乎可以将任何您喜欢的任何兼容的中间件插入到请求处理链中。
  • 可以在一个文件或多个文件中构造该应用程序,并使用任何目录结构。
  • 有太多的选择!

Express 开发环境概述

完整的 Express 本地开发环境包括

  1. Nodejs
  2. NPM 包管理器
  3. Express 应用生成器(可选)

Hello world

1
2
npm init
npm install express —save
1
2
3
4
5
6
7
8
9
// app.js
var express = require("express");
var app = express();
app.get("/", function (req, res) {
res.send("Hello World!");
});
app.listen(3000, function () {
console.log("Example app listening on port 3000!");
});

应用生成器工具

通过应用生成器工具 express-generator 可以快速创建一个应用的骨架。

1
2
3
4
npm install express-generator-g
express helloworld
cd helloworld
npm install
1
2
3
4
# Run the helloworld on Windows
SET DEBUG=helloworld:* & npm start
# Run helloworld on Linux/Mac OS X
DEBUG=helloworld:* npm start
1
2
3
4
5
6
7
8
> helloworld@0.0.0 start /Users/liuhaitao/code/
expressexample/helloworld
> node ./bin/www

helloworld:server Listening on port 3000 +0ms
GET / 200 296.211 ms - 170
GET /stylesheets/style.css 200 4.926 ms - 111
GET /favicon.ico 404 18.522 ms - 1292

文件结构

1
2
3
4
5
6
7
8
9
10
11
12
13
14
15
16
17
18
19
/express-locallibrary-tutorial
app.js
/bin
www
package.json
/node_modules
[约 4,500 个子文件夹和文件]
/public
/images
/javascripts
/stylesheets
style.css
/routes
index.js
users.js
/views
error.pug
index.pug
layout.pug

处理数据流

下图展示了 HTTP 请求/响应处理的主数据流和需要实现的行为

路由:把需要支持的请求(以及请求 URL 中包含的任何信息)转发到适当的控制器函数。

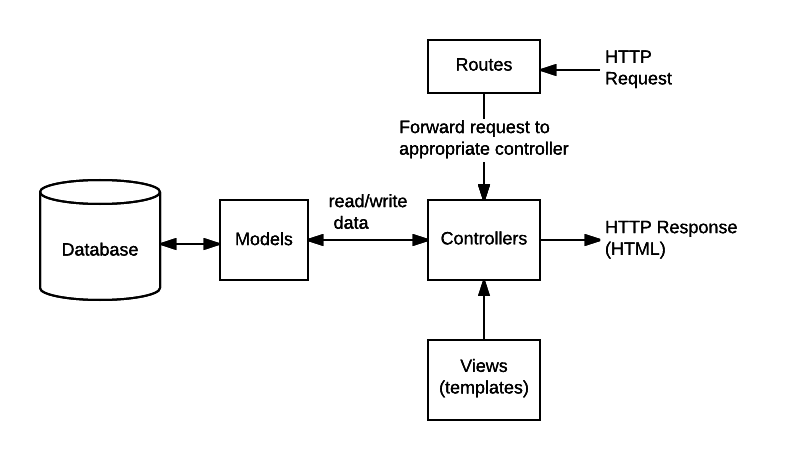
控制器:从模型中获取请求的数据,创建一个 HTML 页面显示出数据,并将页面返回给用户,以便在浏览器中查看。

视图(模板):供控制器用来渲染数据。

基本路由

路由用于确定应用程序如何响应对特定端点的客户机请求,包含一个 URI(或路径)和一个特定的 HTTP 请求方法(GET、 POST 等)。

每个路由可以具有一个或多个处理程序函数,这些函数在路由匹配时执行。

路由定义采用以下结构:

app.METHOD(PATH, HANDLER) 其中:

  • app 是 express 的实例。
  • METHOD 是 HTTP 请求方法。
  • PATH 是服务器上的路径。
  • HANDLER 是在路由匹配时执行的函数。

路由示例

以主页上的 Hello World!进行响应:

1
2
3
app.get("/", function (req, res) {
res.send("Hello World!");
});

在根路由(/)上(应用程序的主页)对 POST 请求进行响应:

1
2
3
app.post("/", function (req, res) {
res.send("Got a POST request");
});

对/user 路由的 PUT 请求进行响应:

1
2
3
app.put("/user", function (req, res) {
res.send("Got a PUT request at /user");
});

app.js or routes/index.js

1
2
3
4
5
6
var express = require("express");
var app = express();
// respond with "hello world" when a GET request is made to the homepage
app.get("/", function (req, res) {
res.send("hello world");
});

路由方法

路由方法派生自 HTTP 方法之一,附加到 express 类的实例。

1
2
3
4
5
6
7
8
// GET method route
app.get("/", function (req, res) {
res.send("GET request to the homepage");
});
// POST method route
app.post("/", function (req, res) {
res.send("POST request to the homepage");
});

特殊路由方法:app.all()

有一种特殊路由方法:app.all(),它并非派生自 HTTP 方法。 该方法用于在所有请求方法的路径中装入中间件函数。

在以下示例中,无论使用 GET、POST、PUT、DELETE 还是在 http 模块中支持的其他任何 HTTP 请求方法,都将为针对“/ secret”的请求执行处理程序。

1
2
3
4
app.all("/secret", function (req, res, next) {
console.log("Accessing the secret section ...");
next(); // pass control to the next handler
});

路由路径

路由路径与请求方法相结合,用于定义可以在其中提出请求的端点。路由路径可以是字符串、字符串模式或正则表达式。

路由路径用于定义可请求的端点。之前示例中路径都是字符串,并且必须精确写为:1/ '、'/about'、'/book',等等。

路由路径也可以是字符串模式(String Pattern)。可用部分正则表达式语法来定义端点的模式。以下是所涉及的正则表达式(注意,连字符(—)和点(.)在字符串路径中解释为字面量,不能做为正则表达式):

?:问号之前的一个字符只能出现零次或一次。例如,路由路径'/ab?cd'路径匹配端点 acd 或 abcd

+:加号之前的一个字符至少出现一次。例如,路径路径'/ab+cd'匹配端点 abcd、abbcd、abbbcd 等

*:星号可以替换为任意字符串。例如,路由路径'/ab*cd'匹配端点 abcd、abXcd、abSOMErandomTEXTcd 等

():将一个字符串视为一体以执行 ?、+、*操作。例如。'/ab(cd)?e'将对(cd)进行匹配,将匹配到 abe 和 abcde

路由路径也可以是 JavaScript 正则表达式。例如,下面的路由路径将匹配 catfish 和 dogfish,但不会匹配 catflap、catfishhead 等。注意,正则表达式路径不再用引号"..."括起来,而是正则表达式语法/.../

1
2
3
app.get(/.*fish$/, (req, res) => {
...
});

Express 使用 path-to-regexp 来匹配路由路径;

1
2
3
4
5
6
7
8
9
10
11
12
13
14
15
16
// 此路由路径将请求与根路由 / 匹配。
app.get("/", function (req, res) {
res.send("root");
});
// 此路由路径将请求与 /about 匹配。
app.get("/about", function (req, res) {
res.send("about");
});
// 此路由路径将请求与 /random.text 匹配。
app.get("/random.text", function (req, res) {
res.send("random.text");
});
// 基于字符串模式的路由路径的示例。此路由路径将匹配 acd 和 abcd。
app.get("/ab?cd", function (req, res) {
res.send("ab?cd");
});

路由参数

路径参数是命名的 URL 段,用于捕获在 URL 中的位置指定的值。命名段以冒号为前缀,然后是名称(例如/:your_parameter_name/。捕获的值保存在 req.params 对象中,键即参数名(例

如 req.params.your_parameter_name)。

路由参数名必须由“单词字符”(/[A—Za—z0—9_]/)组成。

举例说,一个包含用户和藏书信息的 URL:http://localhost:3000/ users/34/books/8989,可以这样提取信息(使用 userld 和 bookld 路径参数):

1
2
3
4
5
app.get("/users/:userId/books/:bookId", (req, res) => {
// 通过 req.params.userId 访问 userId
// 通过 req.params.bookId 访问 bookId
res.send(req.params);
});

路由处理程序

可以提供多个回调函数,以类似于中间件的行为方式来处理请求。唯一例外是这些回调函数可能调用 next('route')来绕过剩余的路由回调。可以使用此机制对路由施加先决条件,在没有理由继续执行当前路由的情况下,可将控制权传递给后续路由。

路由处理程序的形式可以是一个函数、一组函数或者两者的结合,如以下示例中所示。 单个回调函数可以处理一个路由。例如:

1
2
3
4
5
6
7
8
9
10
11
12
13
14
15
// 单个回调函数可以处理一个路由。例如:
app.get("/example/a", function (req, res) {
res.send("Hello from A!");
});
// 多个回调函数可以处理一个路由(确保您指定 next 对象)。例如:
app.get(
"/example/b",
function (req, res, next) {
console.log("the response will be sent by the next function ...");
next();
},
function (req, res) {
res.send("Hello from B!");
}
);
1
2
3
4
5
6
7
8
9
10
11
12
13
// 一组回调函数可以处理一个路由。例如:
var cb0 = function (req, res, next) {
console.log("CB0");
next();
};
var cb1 = function (req, res, next) {
console.log("CB1");
next();
};
var cb2 = function (req, res) {
res.send("Hello from C!");
};
app.get("/example/c", [cb0, cb1, cb2]);
1
2
3
4
5
6
7
8
9
10
11
12
13
14
15
16
17
18
19
20
// 独立函数与一组函数的组合可以处理一个路由。例如:
var cb0 = function (req, res, next) {
console.log("CB0");
next();
};
var cb1 = function (req, res, next) {
console.log("CB1");
next();
};
app.get(
"/example/d",
[cb0, cb1],
function (req, res, next) {
console.log("the response will be sent by the next function ...");
next();
},
function (req, res) {
res.send("Hello from D!");
}
);

响应方法

下表中响应对象(res)的方法可以向客户机发送响应,并终止请求/响应循环。如果没有从路由处理程序调用其中任何方法,客户机请求将保持挂起状态。

方法 描述
res.download() 提示将要下载文件。
res.end() 结束响应进程。
res.json() 发送 JSON 响应。
res.jsonp() 在 JSONP 的支持下发送 JSON 响应。
res.redirect() 重定向请求。
res.render() 呈现视图模板。
res.send() 发送各种类型的响应。
res.sendFile() 以八位元流形式发送文件。
res.sendStatus() 设置响应状态码并以响应主体形式发送其字符串表示。

app.route()

可以使用 app.route() 为路由路径创建链式路由处理程序。因为在单一位置指定路径,所以可以减少冗余和输入错误。有关路由的更多信息,请参阅 Router() 文档。

以下是使用 app.route() 定义的链式路由处理程序的示例。

1
2
3
4
5
6
7
8
9
10
app.route("/book")
.get(function (req, res) {
res.send("Get a random book");
})
.post(function (req, res) {
res.send("Add a book");
})
.put(function (req, res) {
res.send("Update the book");
});

express.Router

使用 express.Router 类来创建可安装的模块化路由处理程序。

Router 实例是完整的中间件和路由系统;因此,常常将其称为“微型应用程序”。 以下示例将路由器创建为模块,在其中装入中间件,定义一些路由,然后安装在主应用程序的路径中。

在应用程序目录中创建名为 birds.js 的路由器文件,其中包含以下内容:

1
2
3
4
5
6
7
8
9
10
11
12
13
14
15
16
var express = require("express");
var router = express.Router();
// middleware that is specific to this router
router.use(function timeLog(req, res, next) {
console.log("Time: ", Date.now());
next();
});
// define the home page route
router.get("/", function (req, res) {
res.send("Birds home page");
});
// define the about route
router.get("/about", function (req, res) {
res.send("About birds");
});
module.exports = router;

接着,在应用程序中装入路由器模块:

1
2
3
var birds = require('./birds');
...
app.use('/birds', birds);

编写中间件

Connect 创造了“中间件”(middleware)这个术语来描述插入式的 Node 模块

从概念上讲,中间件是一种功能的封装方式,具体来说就是封装在程序中处理 HTTP 请求的功能。

中间件是在管道中执行的。

在 Express 程序中,通过调用 app.use 向管道中插入中间件。

Express 工作重点

路由处理器(app.get、app.post 等,经常被统称为 app.VERB)可以被看作只处理特定 HTTP 动词(GET、POST 等)的中间件。同样,也可以将中间件看作可以处理全部 HTTP 动词的路由处理器(基本上等同于 app.all,可以处理任何 HTTP 动词;对于 PURGE 之类特别的动词会有细微的差别,但对于普通的动词而言,效果是一样的)。

路由处理器的第一个参数必须是路径。如果你想让某个路由匹配所有路径,只需用/ *。中间件也可以将路径作为第一个参数,但它是可选的(如果忽略这个参数,它会匹配所有路径,就像指定了八*一样)。

路由处理器和中间件的参数中都有回调函数,这个函数有 2 个、3 个或 4 个参数(从技术上讲也可以有 0 或 1 个参数,但这些形式没有意义)。

  • 如果有 2 个或 3 个参数,头两个参数是请求和响应对象,第三个参数是 next 函数。
  • 如果有 4 个参数,它就变成了错误处理中间件,第一个参数变成了错误对象,然后依次是请求、响应和 next 对象。

如果不调用 next(),管道就会被终止,也不会再有处理器或中间件做后续处理。如果不调用 next(),则应该发送一个响应到客户端(res.send、res.json、res.render 等);如果你不这样做,客户端会被挂起并最终导致超时。

如果调用了 next(),一般不宜再发送响应到客户端。如果你发送了,管道中后续的中间件或路由处理器还会执行,但它们发送的任何响应都会被忽略。

1
2
3
4
5
6
var express = require("express");
var app = express();
app.get("/", function (req, res) {
res.send("Hello World!");
});
app.listen(3000);

中间件函数的简单示例

此函数仅在应用程序的请求通过它时显示“LOGGED”。中间件函数会分配给名为 myLogger 的变量。

请注意以上对 next() 的调用。

  • 调用此函数时,将调用应用程序中的下一个中间件函数。
  • next() 函数不是 Node.js 或 Express API 的一部分,而是传递给中间件函数的第三自变量。
  • next() 函数可以命名为任何名称,但是按约定,始终命名为“next”。
  • 为了避免混淆,请始终使用此约定。

要装入中间件函数,请调用 app.use() 并指定中间件函数。例如,以下代码在根路径(/)的路由之前装入 myLogger 中间件函数。

1
2
3
4
5
6
7
8
9
10
11
var express = require("express");
var app = express();
var myLogger = function (req, res, next) {
console.log("LOGGED");
next();
};
app.use(myLogger);
app.get("/", function (req, res) {
res.send("Hello World!");
});
app.listen(3000);

中间件装入顺序很重要:首先装入的中间件函数也首先被执行。

如果在根路径的路由之后装入 myLogger,那么请求永远都不会到达该函数,应用程序也不会显示“LOGGED”,因为根路径的路由处理程序终止了请求/响应循环。

中间件函数 myLogger 只是显示消息,然后通过调用 next() 函数将请求传递到堆栈中的下一个中间件函数。

示例

名为 requestTime 的属性添加到请求对象

1
2
3
4
var requestTime = function (req, res, next) {
req.requestTime = Date.now();
next();
};

现在,该应用程序使用 requestTime 中间件函数。此外,根路径路由的回调函数使用由中间件函数添加到 req(请求对象)的属性。

1
2
3
4
5
6
7
8
9
10
11
12
13
var express = require("express");
var app = express();
var requestTime = function (req, res, next) {
req.requestTime = Date.now();
next();
};
app.use(requestTime);
app.get("/", function (req, res) {
var responseText = "Hello World!";
responseText += "Requested at: " + req.requestTime + "";
res.send(responseText);
});
app.listen(3000);

使用中间件

Express 是一个路由和中间件 Web 框架,其自身只具有最低程度的功能:

Express 应用程序基本上是一系列中间件函数调用。

中间件函数能够访问请求对象(req)、响应对象(res)以及应用程序的请求/响应循环中的下一个中间件函数。下一个中间件函数通常由名为 next 的变量来表示。

中间件函数可以执行以下任务:

  1. 执行任何代码。
  2. 对请求和响应对象进行更改。
  3. 结束请求/响应循环。
  4. 调用堆栈中的下一个中间件函数。

如果当前中间件函数没有结束请求/响应循环,那么它必须调 用 next(),以将控制权传递给下一个中间件函数。否则,请求将保持挂起状态。

Express 应用程序可以使用以下类型的中间件:

  1. 应用层中间件
  2. 路由器层中间件
  3. 错误处理中间件
  4. 内置中间件
  5. 第三方中间件

可以使用可选安装路径来装入应用层和路由器层中间件。还可以将一系列中间件函数一起装入,这样会在安装点创建中间件系统的子堆栈。

应用层中间件

使用 app.use()app.METHOD() 函数将应用层中间件绑定到应用程序对象的实例,其中 METHOD 是中间件函数处理的请求的小写 HTTP 方法(例如 GET、PUT 或 POST)。

1
2
3
4
5
6
7
8
9
10
11
12
// 此示例显示没有安装路径的中间件函数。应用程序每次收到请求时执行该函数。
var app = express();
app.use(function (req, res, next) {
console.log("Time:", Date.now());
next();
});

// 此示例显示安装在 /user/:id 路径中的中间件函数。在 /user/:id 路径中为任何类型的 HTTP 请求执行此函数。
app.use("/user/:id", function (req, res, next) {
console.log("Request Type:", req.method);
next();
});
1
2
3
4
5
6
7
8
9
10
11
12
13
14
15
16
// 此示例显示一个路由及其处理程序函数(中间件系统)。此函数处理针对 /user/:id 路径的 GET 请求。
app.get("/user/:id", function (req, res, next) {
res.send("USER");
});
// 在安装点使用安装路径装入一系列中间件函数的示例。 演示一个中间件子堆栈,用于显示针对 /user/:id 路径的任何类型 HTTP 请求的信息。
app.use(
"/user/:id",
function (req, res, next) {
console.log("Request URL:", req.originalUrl);
next();
},
function (req, res, next) {
console.log("Request Type:", req.method);
next();
}
);

路由处理程序可以为一个路径定义多个路由。以下示例为针对 /user/:id 路径的 GET 请求定义两个路由。第二个路由不会导致任何问题,但是永远都不会被调用,因为第一个路由结束了请求/响应循环。 此示例显示一个中间件子堆栈,用于处理针对 /user/:id 路径的 GET 请求。

1
2
3
4
5
6
7
8
9
10
11
12
13
14
app.get(
"/user/:id",
function (req, res, next) {
console.log("ID:", req.params.id);
next();
},
function (req, res, next) {
res.send("User Info");
}
);
// handler for the /user/:id path, which prints the user ID
app.get("/user/:id", function (req, res, next) {
res.end(req.params.id);
});

要跳过路由器中间件堆栈中剩余的中间件函数,请调用 next('route') 将控

制权传递给下一个路由。

next('route') 仅在使用 app.METHOD()router.METHOD() 函数装入的中间件函数中有效。

此示例显示一个中间件子堆栈,用于处理针对/user/:id 路径的 GET 请求。

1
2
3
4
5
6
7
8
9
10
11
12
13
14
15
16
17
app.get(
"/user/:id",
function (req, res, next) {
// if the user ID is 0, skip to the next route
if (req.params.id == 0) next("route");
// otherwise pass the control to the next middleware function in this stack
else next(); //
},
function (req, res, next) {
// render a regular page
res.render("regular");
}
);
// handler for the /user/:id path, which renders a special page
app.get("/user/:id", function (req, res, next) {
res.render("special");
});

路由器层中间件

路由器层中间件的工作方式与应用层中间件基本相同,差异之处在于它绑定到 express.Router() 的实例。

1
var router = express.Router();

使用 router.use()router.METHOD() 函数装入路由器层中间件。

1
2
3
4
5
6
7
8
9
10
11
12
13
14
15
16
17
18
19
20
21
22
23
24
25
26
27
28
29
30
31
32
33
34
35
36
37
38
39
40
var app = express();
var router = express.Router();
// a middleware function with no mount path. This code is executed for every request to the router
router.use(function (req, res, next) {
console.log("Time:", Date.now());
next();
});
// a middleware sub-stack shows request info for any type of HTTP request to the /user/:id path
router.use(
"/user/:id",
function (req, res, next) {
console.log("Request URL:", req.originalUrl);
next();
},
function (req, res, next) {
console.log("Request Type:", req.method);
next();
}
);
// a middleware sub-stack that handles GET requests to the /user/:id path
router.get(
"/user/:id",
function (req, res, next) {
// if the user ID is 0, skip to the next router
if (req.params.id == 0) next("route");
// otherwise pass control to the next middleware function in this stack
else next(); //
},
function (req, res, next) {
// render a regular page
res.render("regular");
}
);
// handler for the /user/:id path, which renders a special page
router.get("/user/:id", function (req, res, next) {
console.log(req.params.id);
res.render("special");
});
// mount the router on the app
app.use("/", router);

错误处理中间件

错误处理中间件始终采用四个自变量。必须提供四个自变量,以将函数标识为错误处理中间件函数。即使无需使用 next 对象,也必须指定该对象以保持特征符的有效性。否则,next 对象将被解释为常规中间件,从而无法处理错误。

错误处理中间件函数的定义方式与其他中间件函数基本相同,差别在于错误处理函数有四个自变量而不是三个,专门具有特征符(err,req,res,next):

1
2
3
4
app.use(function (err, req, res, next) {
console.error(err.stack);
res.status(500).send("Something broke!");
});

内置中间件

自 V4.x 起,Express 不再依赖于 Connect。除 express.static 外,先前

Express 随附的所有中间件函数现在以单独模块的形式提供。请查看中间件函数的列表。

express.static(root,[options])

Express 中唯一内置的中间件函数是 express.static。此函数基于 serve-static,负责提供 Express 应用程序的静态资源。

root 自变量指定从其中提供静态资源的根目录。可选的 options 对象可以具有以下属性:

以下示例将使用了 express.static 中间件,并且提供了一个详细的'options'对象(作为示例):

1
2
3
4
5
6
7
8
9
10
11
12
var options = {
dotfiles: "ignore",
etag: false,
extensions: ["htm", "html"],
index: false,
maxAge: "1d",
redirect: false,
setHeaders: function (res, path, stat) {
res.set("x-timestamp", Date.now());
},
};
app.use(express.static("public", options));

对于每个应用程序,可以有多个静态目录:

1
2
3
app.use(express.static("public"));
app.use(express.static("uploads"));
app.use(express.static("files"));

第三方中间件

使用第三方中间件向 Express 应用程序添加功能。

安装具有所需功能的 Node.js 模块,然后在应用层或路由器层的应用程序中将其加装入。

以下示例演示如何安装和装入 cookie 解析中间件函数 cookie—parser。

1
$ npm install cookie-parser
1
2
3
4
5
var express = require("express");
var app = express();
var cookieParser = require("cookie-parser");
// load the cookie-parsing middleware
app.use(cookieParser());

将模板引擎用于 Express

Express 应用生成器支持多款流行的视图/模板引擎,包括 EJS、Hbs、Pug(Jade)、Twig 和 Vash,缺省选项是 Jade。Express 本身也支持大量其他模板语言,开箱即用

在 Express 可以呈现模板文件之前,必须设置以下应用程序设置:

  • views:模板文件所在目录。例如:app.set('views', './views')
  • view engine:要使用的模板引擎。例如:app.set('view engine', 'pug') 然后安装对应的模板引擎 npm 包:
1
$ npm install pug --save

在设置视图引擎之后,不必指定该引擎或者在应用程序中装入模板引擎模块;Express 在内部装入此模块,如下所示(针对以上示例)。

1
app.set("view engine", "pug");

在 views 目录中创建名为 index.pug 的 Pug 模板文件,其中包含以下内容:

1
2
3
4
5
html
head
title=title
body
h1=message

随后创建路由以呈现 index.pug 文件。如果未设置 view engine 属性,必须指定 view 文件的扩展名。否则,可以将其忽略。

1
2
3
app.get("/", function (req, res) {
res.render("index", { title: "Hey", message: "Hello there!" });
});

向主页发出请求时,index.pug 文件将呈现为 HTML。

选用模板引擎需要考虑的因素

一般来说,你应该选择一个大而全的模板引擎,可以尽快进入生产状态。就像你选择其他组件一样!选用模板引擎需要考虑以下因素:

  1. 进入生产状态的时间——如果你的团队已经有某个模板语言的经验,那么用它可能更快进入生产状态。否则你应该考虑所选模板引擎的学习曲线。
  2. 流行度和活跃度——要评估所选引擎的流行程度,以及它是否拥有活跃的社区。在网站的生命周期中遇到问题时,是否能够获得相关支持非常重要。
  3. 风格——某些模板引擎使用特定标记,来标识插入“普通”HTML 中的内容,而另一些模板引擎使用不同的语法(例如使用缩进和块名称)构造 HTML。
  4. 性能/渲染时间。
  5. 功能——你应该考虑所选引擎是否具有以下功能:
    1. 布局继承:可以定义基本模板,然后“继承”它的一部分,使不同页面可以有不同的呈现。这通常比包含大量所需组件,或每次从头开始构建模板更好。
    2. “包含”支持:可以通过包含其他模板来构建新模板。
    3. 简明的变量和循环控制语法。
    4. 能够在模板级别过滤变量值(例如,将变量设置为大写,或格式化日期值)。
    5. 能够生成 HTML 以外的输出格式(例如 JSON 或 XML)。
    6. 支持异步操作和流。
    7. 可以同时在客户端和服务器上使用。如果一款模板引擎可以在客户端使用,那么就使在客户端托管数据并完成所有(或大多数)渲染成为可能。

为 Express 开发模板引擎

可以使用 app.engine(ext, callback) 方法创建自己的模板引擎。

  • ext 表示文件扩展名,
  • callback 表示模板引擎函数,它接受以下项作为参数:文件位置、选项对象和回调函数。

以下代码示例实现非常简单的模板引擎以呈现 .ntl 文件。

1
2
3
4
5
6
7
8
9
10
11
12
13
14
15
var fs = require("fs"); // this engine requires the fs module
app.engine("ntl", function (filePath, options, callback) {
// define the template engine
fs.readFile(filePath, function (err, content) {
if (err) return callback(new Error(err));
// this is an extremely simple template engine
var rendered = content
.toString()
.replace("#title#", "" + options.title + "")
.replace("#message#", "" + options.message + "");
return callback(null, rendered);
});
});
app.set("views", "./views"); // specify the views directory
app.set("view engine", "ntl"); // register the template engine

应用程序现在能够呈现 .ntl 文件。在 views 目录中创建名为 index.ntl 且包含以下内容的文件:

1
2
#title#
#message#

然后,在应用程序中创建以下路径:

1
2
3
app.get("/", function (req, res) {
res.render("index", { title: "Hey", message: "Hello there!" });
});

您向主页发出请求时,index.ntl 将呈现为 HTML。

调试 Express

Express 在内部使用调试模块来记录关于路由匹配、使用的中间件函数、应用程序模式以及请求/响应循环流程的信息。

debug 就像是扩充版的 console.log,但是与 console.log 不同,不必注释掉生产代码中的 debug 日志。缺省情况下,日志记录功能已关闭,可以使用 DEBUG 环境变量有条件地开启日志记录。

要查看 Express 中使用的所有内部日志,在启动应用程序时,请将 DEBUG 环境变量设置为 express:*。

1
$ DEBUG=express:* node index.js

在 Windows 上,使用对应的命令。

1
>set DEBUG=express:* & node index.js
1
2
3
4
5
6
7
8
9
10
11
12
13
14
15
$ DEBUG=express:* node ./bin/www
express:router:route new / +0ms
express:router:layer new / +1ms
express:router:route get / +1ms
express:router:layer new / +0ms
express:router:route new / +1ms
express:router:layer new / +0ms
express:router:route get / +0ms
express:router:layer new / +0ms
express:application compile etag weak +1ms
express:application compile query parser extended
+0ms
express:application compile trust proxy false +0ms
express:application booting in development mode
+1ms

向应用程序发出请求时,可以看到 Express 代码中指定的日志:

1
2
3
4
5
6
7
8
9
10
11
12
13
14
15
express:router dispatching GET / +4h
express:router query : / +2ms
express:router expressInit : / +0ms
express:router favicon : / +0ms
express:router logger : / +1ms
express:router jsonParser : / +0ms
express:router urlencodedParser : / +1ms
express:router cookieParser : / +0ms
express:router stylus : / +0ms
express:router serveStatic : / +2ms
express:router router : / +2ms
express:router dispatching GET / +1ms
express:view lookup "index.pug" +338ms
express:view stat "/projects/example/views/
index.pug" +0ms